Amazon VPC 内に、Simple ADを利用して、AWS WorkSpacesを始める手順を説明します。
Amazon VPCはプライベートサブネットで、アベイラビリティゾーンが2つ作成されいることとします。

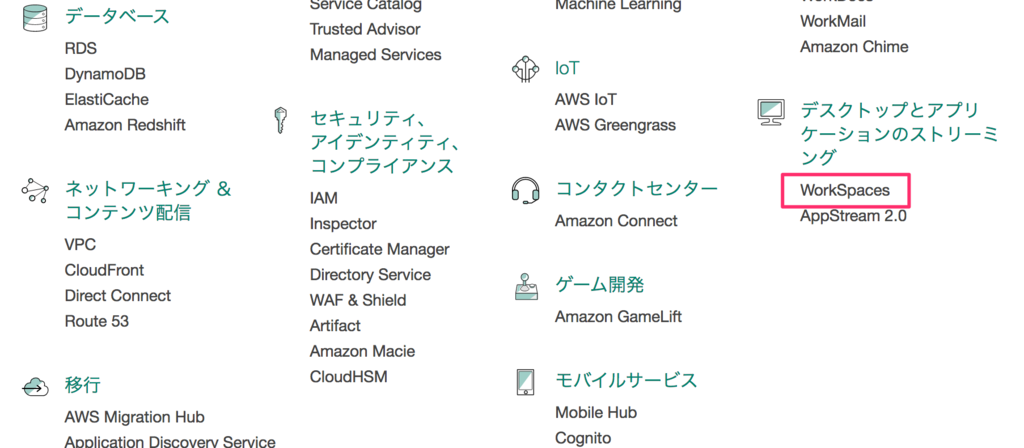
サービスで「WorkSpaces」をクリックします。

WorkSpacesの画面が表示されるので、「Get Started Now」をクリックします。
Simple AD の作成

Advanced Setupの「Launch」をクリックします。

「Simple AD の作成」をクリックします。

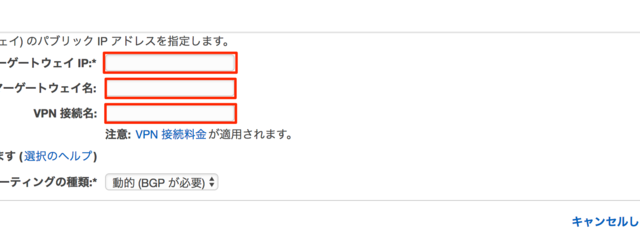
入力例です。
組織名「hirokun」
ディレクトリ DNS「hirokun.local」
NetBIOS名「HIROKUN」

VPCはあらかじめ作成しておいたVPCを選択します。
サブネットはあらかじめ作成しておいた、ap-northeast-1cとap-northeast-1aのプライベートサブネットを選択します。

内容を確認して問題なければ、「Simple AD の作成」をクリックします。

Statusが「Requestd」になります。

2分後には、Organization Nameが表示され、Statusが「Creating」に変化しました。

5分後には、Statusが「Active」に変化しました。
Simple AD はLinuxやWindowsから管理できます。
Linuxで管理▼
AWS Solutions Architect ブログ: Simple ADディレクトリのID管理方法
Windowsで管理▼
ユーザーおよびグループを追加する (Simple AD および Microsoft AD) – AWS Directory Service
WorkSpacesの作成

画面左の「WorkSpaces」をクリックします。

「Launch WorkSpaces」をクリックします。

Directoryには先に作成した、Simple Directoryの名前が入ります。
「Next Step」をクリックします。

Username、First Name、Last Name、Email、全項目を入力します。
全項目必須です。
「Create Users」をクリックします。
画面を下にスクロールすると、作成したユーザが表示されています。

「Next Step」をクリックします。
画面を下にスクロールします。

BundleとLanguage(日本語と英語が選べます)を選択します。
画面を下にスクロールします。

ユーザ名、Bundle、Languageを確認します。
「Next Step」をクリックします。

Running Modeや、Encryptionを変更できます。
Running Modeではずっと起動させておくか、何時間で停止するか選択することができます。
停止時間を選択した場合は時間課金となります。
Eccryptionにより、ハードディスクの暗号化が可能となります。
画面を下にスクロールします。

「Next Step」をクリックします。

最後の画面となります。
自動停止の時間や、ハードディスクの暗号化が選択できます。
「Launch WorkSpaces」をクリックします。

作成されるまで最大20分かかります。
作成されるとユーザにメールが送信されます。

Statusが「AVAILABLE」になれば作成完了です。
メールが届きますので引き続き作業します。

1.のURLをクリックすると表示される画面でパスワードを設定します。

パスワードを入力して、ユーザーの更新をクリックします。

ユーザーの更新が完了すると、クライアントダウンロードの画面が表示されるのでお使いのOS用のクライアントをダウンロードして導入します。
メールの手順に従って作業します。
無事にWindows7の画面が表示されればOKです。
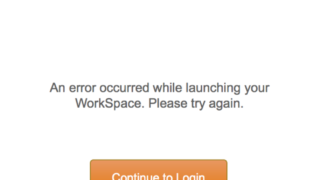
WorkSpacesが開始できなくなった時の対応

わたしの場合、WorkSpacesを表示して、シャットダウン時に更新プログラムで更新を行うと、WorkSpacesを開始してもずっとSTARTINGのままで、時間が経つとSTOPPEDになるとゆう現象が繰り返されるようになりました。
この場合、AutoStopに設定されている1時間以内にアップデートが終わってない可能性がありますので、AutoStopの値を6時間以上に設定してください。
AWS WorkSpacesには無料利用枠があります
公式サイトの無料利用枠についての説明はこちら▼
料金 – Amazon WorkSpaces(仮想クラウドデスクトップ) | AWS
Windows7もしくはWindows7のスタンダードバンドルで無料利用枠が適用されます。
1ヶ月あたり合計最大で40時間となっていて、有効期限は利用を開始して2ヶ月間となっています。
利用していなくても2ヶ月が経過すると料金が発生しますので注意してください。