GLPIというオープンソースの資産管理ツールをご存知だろうか?
簡単に説明すると会社にある資産(パソコンやディスプレイ、ソフトウェアなど)を管理するためのソフトウェア
オープンソースというと出来具合それも日本語化などに関しては問題があるソフトウェアが多い中、このGLPIの日本語化はほとんど完璧
無料で資産管理を使って見るには絶好のツールとなる。おまけに高機能
まさに入門用にはとってもいいソフトウェアなのだ
今回はGLPIの導入のみならず、前回導入した「OCS Inventory NG」を導入したサーバに同居という形で導入し連携までを行います
関連文書:【Amazon Linux】OCS Inventory NG 2.4.1 インストール
具体的に連携で何をするかというとパソコンについては入力せずに、OCS Inventory NGで自動収集したデータを利用し入力の手間を省くというもの
他の使い方としては、OCS Inventory NGの画面がかなりしょぼいので管理画面でのGLPIという手もある。しかし収集したソフトウェアの同期などはできない
GLPIのインストール
データベース作成(MySQL)
mysql -uroot -p
mysql> create database glpi;
mysql> grant all privileges on glpi.* to glpi@localhost identified by 'パスワード';
mysql> flush privileges;
mysql> exit
phpオプションパッケージのインストール
yum install php70-pecl-apcu php70-xmlrpc php70-ldap php70-imap php70-opcache
php設定変更
/etc/php.ini
date.timezone = “Asia/Tokyo”
Apache設定変更
GLPIディレクトリ.htaccess有効化
cat <<EOF >/etc/httpd/conf.d/glpi.conf
  <Directory "/var/www/html/glpi">
  AllowOverride All
  </Directory>
EOF
Apache再起動
sudo service httpd restart
GLPIダウンロード
最新パッケージ(今回は9.2.3でした)をこちらからダウンロード
後述するが、OCS Inventory NGとの連携でバージョンがとても重要です!
もしこちらと違うバージョンを使っている方は、OCS Inventory NG連携用のプラグインもバージョンにあったものを使って下さい
tar xvfz glpi-9.2.3.tgz
sudo mv glpi /var/www/html
sudo chown -R apache.apache /var/www/html/glpi
GLPIセットアップ

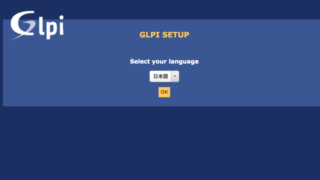
日本語を選択して「OK」をクリック

「ライセンスを読みました。これを受諾します」を選択して「続行」をクリック

「インストール」をクリック

すべての項目がチェックされていることを確認して「続行」をクリック

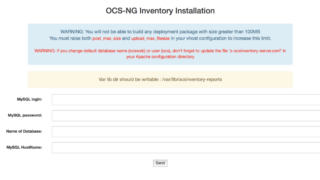
データベースへの接続情報を入力して「続行」をクリック

glpiを選択して「続行」をクリック

データベースの初期化が完了したことを確認して「続行」をクリック

利用データの収集をしても良いかと質問があります。わたしは嫌なので「Send “usage statistics”」のチェックを外して「続行」をクリック

インストールが完了したことを確認し「GLPIを使用」をクリック

ユーザ名とパスワードに「glpi」を入力し「実行」をクリック

ダッシュボードが表示されました
GLPIのインストールはこれにて完了です
これでGLPIの利用は可能ですが、いちいち手入力でパソコンの登録は面倒
そこで、パソコンの情報などを自動で収集できるOCS Inventory NGとの連携が便利です
GLPI(オープンソース資産管理ツール)をOCS Inventory NGと連携