前回はGLPIの導入までをおこないましたが、今回は自動でコンピュータの情報を収集できるOCS Inventory NGとの連携プラグインのセットアップをおこなっていきます
OCS Inventory NG 連携プラグインのセットアップ
連携プラグインのダウンロードと配置
cd /tmp
wget https://github.com/pluginsGLPI/ocsinventoryng/releases/download/1.4.3/glpi-ocsinventoryng-1.4.3.tar.gz
tar xvfz glpi-ocsinventoryng-1.4.3.tar.gz
sudo mv ocsinventoryng /var/www/html/glpi/plugins/
sudo chown -R apache. /var/www/html/glpi/plugins/ocsinventoryng
連携プラグインの導入と設定
GLPIのWebコンソールにログインします
![f:id:ishimotohiroaki:20180509160033p:plain f:id:ishimotohiroaki:20180509160033p:plain](https://it.hirokun.net/wp-content/uploads/2019/03/20180509160033.png)
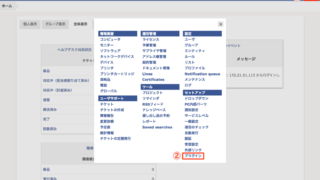
「三」をクリックし「プラグイン」をクリック
![f:id:ishimotohiroaki:20180509161532p:plain f:id:ishimotohiroaki:20180509161532p:plain](https://it.hirokun.net/wp-content/uploads/2019/03/20180509161532.png)
「インストール」をクリック
![f:id:ishimotohiroaki:20180509161824p:plain f:id:ishimotohiroaki:20180509161824p:plain](https://it.hirokun.net/wp-content/uploads/2019/03/20180509161824.png)
「有効にする」をクリック
![f:id:ishimotohiroaki:20180509161935p:plain f:id:ishimotohiroaki:20180509161935p:plain](https://it.hirokun.net/wp-content/uploads/2019/03/20180509161935.png)
「OCS Inventory NG」をクリック
![f:id:ishimotohiroaki:20180509162026p:plain f:id:ishimotohiroaki:20180509162026p:plain](https://it.hirokun.net/wp-content/uploads/2019/03/20180509162026.png)
「OCSNG servers」をクリック
![f:id:ishimotohiroaki:20180509162136p:plain f:id:ishimotohiroaki:20180509162136p:plain](https://it.hirokun.net/wp-content/uploads/2019/03/20180509162136.png)
![f:id:ishimotohiroaki:20180509162402p:plain f:id:ishimotohiroaki:20180509162402p:plain](https://it.hirokun.net/wp-content/uploads/2019/03/20180509162402.png)
OCSデータベースへの接続情報を入力して「追加」をクリック
![f:id:ishimotohiroaki:20180509162900p:plain f:id:ishimotohiroaki:20180509162900p:plain](https://it.hirokun.net/wp-content/uploads/2019/03/20180509162900.png)
しかしこのままでは「TRACE_DELETED・・・」エラーとなり接続できていません
OCSNG側での設定変更が必要です
![f:id:ishimotohiroaki:20180509163302p:plain f:id:ishimotohiroaki:20180509163302p:plain](https://it.hirokun.net/wp-content/uploads/2019/03/20180509163302.png)
![f:id:ishimotohiroaki:20180509163458p:plain f:id:ishimotohiroaki:20180509163458p:plain](https://it.hirokun.net/wp-content/uploads/2019/03/20180509163458.png)
「Server」をクリック、TRACE_DELETED「ON」をクリック、「Update」をクリック
![f:id:ishimotohiroaki:20180509163645p:plain f:id:ishimotohiroaki:20180509163645p:plain](https://it.hirokun.net/wp-content/uploads/2019/03/20180509163645.png)
GLPIの画面をリロードして接続試験が成功したことを確認
![f:id:ishimotohiroaki:20180509163852p:plain f:id:ishimotohiroaki:20180509163852p:plain](https://it.hirokun.net/wp-content/uploads/2019/03/20180509163852.png)
![f:id:ishimotohiroaki:20180509164002p:plain f:id:ishimotohiroaki:20180509164002p:plain](https://it.hirokun.net/wp-content/uploads/2019/03/20180509164002.png)
「Inventory Import」をクリック
![f:id:ishimotohiroaki:20180509164120p:plain f:id:ishimotohiroaki:20180509164120p:plain](https://it.hirokun.net/wp-content/uploads/2019/03/20180509164120.png)
「新しいコンピュータをインポート」をクリック
![f:id:ishimotohiroaki:20180509164427p:plain f:id:ishimotohiroaki:20180509164427p:plain](https://it.hirokun.net/wp-content/uploads/2019/03/20180509164427.png)
「インポート」をクリック
![f:id:ishimotohiroaki:20180509164626p:plain f:id:ishimotohiroaki:20180509164626p:plain](https://it.hirokun.net/wp-content/uploads/2019/03/20180509164626.png)
これで成功です。
無事にOCS Inventory NGで収集したデータのインポートが完了しました。
OCSNGからGLPIへの自動インポート設定
手動でのインポートは成功しましたが、手動となるとインポートを忘れたりして情報が古くなる可能性があるので自動で実行するように設定します
Synchronisation methodをExpertに変更
![f:id:ishimotohiroaki:20180510124513p:plain f:id:ishimotohiroaki:20180510124513p:plain](https://it.hirokun.net/wp-content/uploads/2019/03/20180510124513.png)
「三」メニューをクリック、「プラグイン」をクリック
![f:id:ishimotohiroaki:20180510124703p:plain f:id:ishimotohiroaki:20180510124703p:plain](https://it.hirokun.net/wp-content/uploads/2019/03/20180510124703.png)
「OCS Inventory NG」をクリック
![f:id:ishimotohiroaki:20180510124901p:plain f:id:ishimotohiroaki:20180510124901p:plain](https://it.hirokun.net/wp-content/uploads/2019/03/20180510124901.png)
「OCSNG servers」をクリック
![f:id:ishimotohiroaki:20180510125033p:plain f:id:ishimotohiroaki:20180510125033p:plain](https://it.hirokun.net/wp-content/uploads/2019/03/20180510125033.png)
「OCS」をクリック
![f:id:ishimotohiroaki:20180510125206p:plain f:id:ishimotohiroaki:20180510125206p:plain](https://it.hirokun.net/wp-content/uploads/2019/03/20180510125206.png)
Synchronisation methodで「Expart(Fully automatic, for large configuration)」を選択、「保存」をクリック
シェルとクーロンの設定
sudo chmod +x /var/www/html/glpi/plugins/ocsinventoryng/scripts/ocsng_fullsync.sh
手動実行
sudo -u apache /var/www/html/glpi/plugins/ocsinventoryng/scripts/ocsng_fullsync.sh –thread_nbr=2 –server_id=1
thread_nbrは起動スレッド数、server_idはOCSNGサーバIDを指定する
自動実行するようにcronに設定する
sudo vi /etc/cron.d/glpi
0 11 * * * apache /var/www/html/glpi/plugins/ocsinventoryng/scripts/ocsng_fullsync.sh –thread_nbr=2 –server_id=1
わたしは1日に1回で十分だったので、毎日11:00に収集するように設定しました
5分おきに同期したい場合などは*/5 * * * *とすればいいです
動作しているかどうかは以下の手順で確認できます
![f:id:ishimotohiroaki:20180510132157p:plain f:id:ishimotohiroaki:20180510132157p:plain](https://it.hirokun.net/wp-content/uploads/2019/03/20180510132157.png)
「ツール」をクリック、「OCS Inventory NG」をクリック
下の方にスクロール
![f:id:ishimotohiroaki:20180510132328p:plain f:id:ishimotohiroaki:20180510132328p:plain](https://it.hirokun.net/wp-content/uploads/2019/03/20180510132328.png)
「Scripts execution of automatic actions」をクリック
![f:id:ishimotohiroaki:20180510132443p:plain f:id:ishimotohiroaki:20180510132443p:plain](https://it.hirokun.net/wp-content/uploads/2019/03/20180510132443.png)