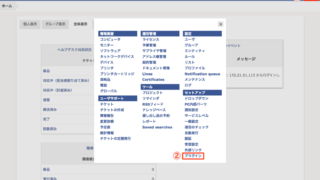

AWSサービスの一覧から、VPCをクリックします。
VPCの作成

「VPC ウィザードの開始」をクリックします。
デフォルトですでに1VPC作成されています。
これは仕様であり、デフォルトVPCは削除することもできます。
詳しくは以下を参照してください。
デフォルト VPC とデフォルトサブネット – Amazon Virtual Private Cloud
VPCのデフォルトだと上限は5になっており、それ以上作成する場合は緩和の申請が必要です。

「プライベートのサブネットのみで、ハードウェアVPN アクセスを持つVPC」をクリックし、「選択」をクリックします。

IPv4 CIDR ブロックは、10.0.0.0/16にします。
VPC名を入力します。わたしは、「VPC-????」を使います。後でも変更できます。
プライベートサブネットのIPv4 CIDRは、10.0.5.0/24にします。
アベイラビリティーゾーンは、ap-northeast-1aにします。
「次」をクリックします。

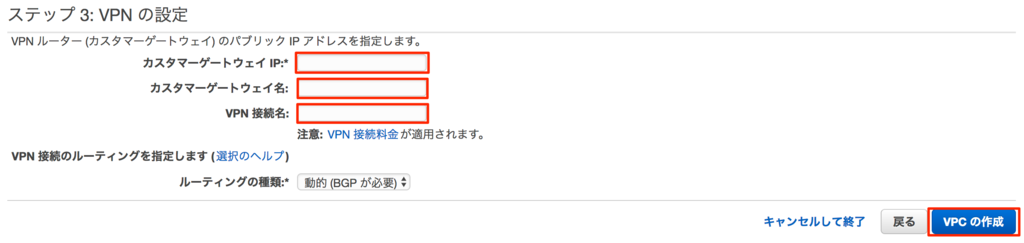
「カスタマーゲートウェイIP」を入力します。これは自分の方のVPNルータのIPアドレスとなります。
「カスタマーゲートウェイ名」を入力します。これは自分の方の名前となります。わたしは「CG-????」と入力します。
「VPN接続名」を入力します。これはAWSの方の接続名となります。わたしは「VPN-????」と入力します。
最後に「VPNの作成」をクリックします。

VPN作成が開始されますので待ちましょう。
今回は約2分で作成が完了しました。

「OK」をクリックします。
VPCの一覧が表示されて、さきほど作成したVPCが表示されます。
VPN接続用ルーター設定ファイルのダウンロード

「VPN接続」をクリックします。

該当のVPN接続をクリックします。
「設定のダウンロード」をクリックすることで該当の機種用の設定ファイルをダウンロードすることができます。
ダウンロードしたファイルを元にVPNルーターを設定します。
ルートテーブルの変更
VPNルーターにルーティングするようにルートテーブルを設定します。

ルートテーブルをクリックします。

変更したいサブネットを選択します。
該当のルーティングテーブルが表示されますので、「ルート」タブをクリックします。
今回は192.168.xxx.xxx向けのルートを幾つか追加しました。
これでそのIPアドレスについてはVPNルーターにルーティングされるようになります。