TZ300Wのファームウェアを更新することにしました。
理由は単純に古くなってきているからです。年末年始に何かあっても嫌だなと思いました。
結論からいうとファームウェア更新して良かったです。
CPUの負荷が減りました。
大まかな手順
まずは大まかな手順を説明します。
- mysonicwallから最新ファームウェアのダウンロード
- 現在のファームウェアのダウンロード
- 設定のエクスポート
- 設定のバックアップの作成
- 最新ファームウェアのアップロード
- 再起動
順調にいけば30分ほどの作業となります。
最新ファームウェアのダウンロード
mysonicwallからダウンロードできます。
SonicWallにブラウザで接続できるパソコンにファームウェアを保管します。
mysonicwallにログイン
MySonicWallにアクセスしログインします。
ファームウェアのダウンロード

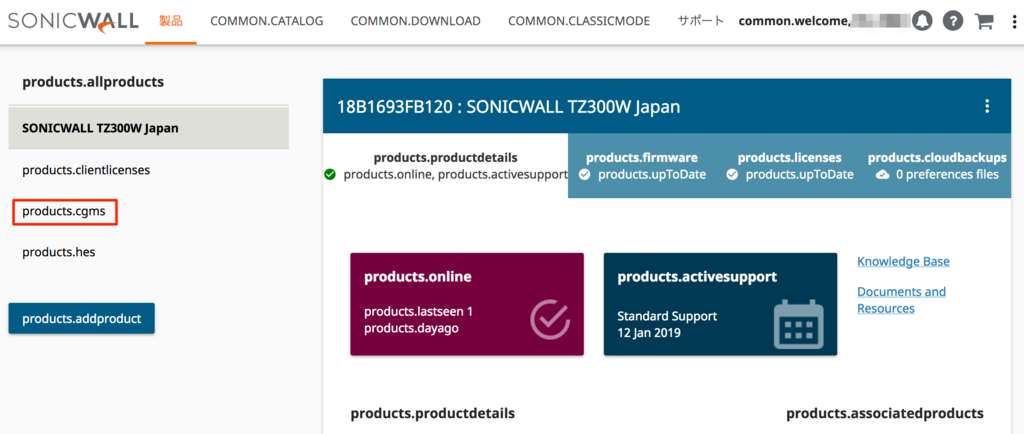
mysonicwallの新しい画面の操作方法がまだ分からないので旧の画面を表示させます。
[products.cgms]をクリックすると旧の画面が表示されます。

[ダウンロード]をクリックします。
Serial Noをクリックします。

Languageで「Japanese」を選択します。
※すごく重要です。これをしないと別言語のファームウェアがダウンロードされます。
[TZ300W]をクリックしてファームウェアを保存します。
[Upgrade Guide SonicOS]をクリックすると日本語のガイドが保存されます。
SonicWallでファームウェアを更新する
ファームウェアを保管したパソコンでブラウザを開き、SonicWallの管理画面を表示します。
[システム] – [設定]をクリックします。

この画面ですべての操作を行います。
現在のファームウェアのダウンロード

現在のファームウェアのダウンロードアイコンをクリックします。

「sw_firmware_current.bin.sig」というファイル名で保存されます。
[OK]をクリックしてファイルを保存します。
設定のエクスポート

[設定のエクスポート]をクリックします。

[エクスポート]をクリックします。

「sonicwall-TZ_300_wireless-AC-6_2_6_1-25n_jpn.exp」というファイル名で保存されます。
[OK]をクリックしてファイルを保存します。
設定のバックアップの作成

[設定のバックアップの作成]をクリックします。

ファームウェアのアップロード
前もってmysonicwallからダウンロードしておいた最新ファームウェアを使って、SonicWallにファームウェアをアップロードします。

[ファームウェアのアップロード]をクリックします。

[選択]をクリックし、ダウンロードしておいたファイルを選択します。
[アップロード]をクリックします。

アップロードが完了すると、アップロードされたファームウェアが増えます。
「アップロードされたファームウェア」の起動アイコンをクリックし、新しいファームウェアを適用するためにSonicWallを再起動します。

すでに「バックアップ設定」も「エクスポート」も完了しているので、[OK]をクリックします。

最長で8分かかります。わたしは5分くらいで完了しました。
電源を切らないように気をつけてください。

無事に更新され、新しいファームウェアが適用されました。