スポンサーリンク
GLPIは、Webコンソールへのログイン認証、Active Directoryを利用することができます。
認証方法にLDAPサーバを追加

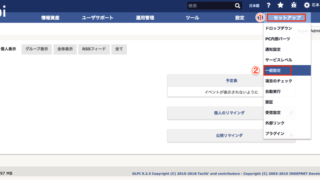
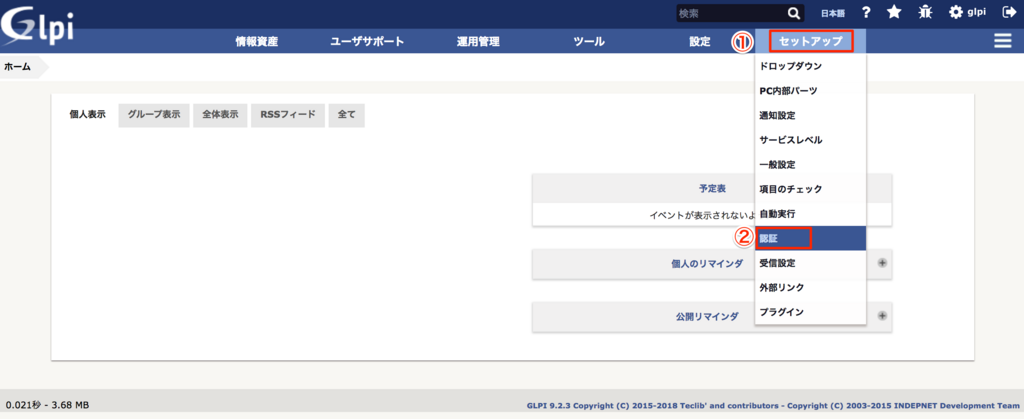
「セットアップ」をクリック、「認証」をクリック

「LDAPディレクトリ」をクリック

「+」をクリック

上の画面を参考に、環境にあわせて変更してください
(DCは続けて書く必要があります。例えばhirokun.netの場合はDC=hirokun,DC=netというふうになります)
「追加」をクリック

画面右下に表示される「テスト成功」を確認します
Active Directoryからユーザ情報のインポート

「設定」をクリック、「ユーザ」をクリック

「LDAPディレクトリリンク」をクリック

「新しいユーザをインポート」をクリック

「検索」をクリック
ActiveDirectoryに登録されている一覧が表示されます

インポートしたいユーザを選択、「操作」をクリック

「インポート」をクリック

「インポート」を選択して「実行」をクリック
ユーザ一覧に追加されます
プロファイルの追加(管理者への昇格)
ActiveDirectoryからインポートしたユーザには「Self-Service」プロファイルが割り当てられます。このSelf-Serviceプロファイルは最も制限されているプロファイルです。
今回インポートユーザを管理者に昇格する方法です。

ユーザを選択し、「操作」をクリック

設定を変更し「追加」をクリック
さいごに
追加したユーザはコンピュータに紐付けることもできます
ActiveDirectoryが導入されているならできるだけ手間をかけずにユーザ登録して管理しましょう
スポンサーリンク
スポンサーリンク