AWSで、以前OpenVPNを構築した時は、easy-rsaがバージョン2だったのですが、今構築しようとすると、easy-rsaがバージョン3となっています。
今回はAmazon Linuxで、標準パッケージのOpenVPNとEPELパッケージのeasy-rsa 3で構築しました。
Amazon Linux 2は標準パッケージにOpenVPNが入ってないので使いません。
目次:
easy-rsaのバージョン2とバージョン3で大きな違い
コマンドがeasy-rsaのみとなりました。
コマンド実行前にvarsを実行する必要がなくなりました。「cn_only」というCommonNameのみ入力すれば鍵が作成されるモードがデフォルトとなり、鍵を作成するための情報をもったvarsファイルを作成する意味がなくなったためです。
もちろん今までと同様のモード「org」に変更することも可能です。
作成の手順としては今までとほぼ同じです。
それでは構築していきます。
インストール
OpenVPN
sudo yum install openvpn
easy-rsa
sudo yum install easy-rsa --enablerepo=epel
/usr/share/easy-rsaに導入されます。
認証局と鍵の作成
認証局の初期化
sudo -s
cd /usr/share/easy-rsa/3
./easyrsa init-pki
init-pki complete; you may now create a CA or requests.
Your newly created PKI dir is: /usr/share/easy-rsa/3/pki
認証局を作成前にのみ実行します。
メッセージからpkiディレクトリが作成されています。
認証局の作成
./easyrsa build-ca
Generating a 2048 bit RSA private key
.........................................................+++
...............................................................+++
writing new private key to '/usr/share/easy-rsa/3/pki/private/ca.key.FL7BTHsUxo'
Enter PEM pass phrase:
Verifying - Enter PEM pass phrase:
-----
You are about to be asked to enter information that will be incorporated
into your certificate request.
What you are about to enter is what is called a Distinguished Name or a DN.
There are quite a few fields but you can leave some blank
For some fields there will be a default value,
If you enter '.', the field will be left blank.
-----
Common Name (eg: your user, host, or server name) [Easy-RSA CA]:
CA creation complete and you may now import and sign cert requests.
Your new CA certificate file for publishing is at:
/usr/share/easy-rsa/3/pki/ca.crt
ここで入力したのは「pass phrase」のみです。
cn_onlyモードとなっているので、Common Nameしか聞かれていません。
わたしはCommon Nameもデフォルトにしました。
DHパラメータの生成
./easyrsa gen-dh
Generating DH parameters, 2048 bit long safe prime, generator 2
This is going to take a long time
....................................................+...........................
................................................................................
................................................................................
.........................................................................+......
〜 略 〜
....................................+................................+..........
................................................................................
.............................................................++*++*
DH parameters of size 2048 created at /usr/share/easy-rsa/3/pki/dh.pem
サーバ証明書と秘密鍵の作成
nopassオプションでパスフレーズを不要にしています。
./easyrsa build-server-full server1 nopass
Generating a 2048 bit RSA private key
...................+++
.........................................................................................................+++
writing new private key to '/usr/share/easy-rsa/3/pki/private/server1.key.O7Mt8gb0z2'
-----
Using configuration from ./openssl-1.0.cnf
Enter pass phrase for /usr/share/easy-rsa/3/pki/private/ca.key:
Check that the request matches the signature
Signature ok
The Subject's Distinguished Name is as follows
commonName :ASN.1 12:'server1'
Certificate is to be certified until Mar 27 02:46:17 2028 GMT (3650 days)
Write out database with 1 new entries
Data Base Updated
ここで入力したのは認証局の作成の時に設定したパスワードのみです。
クライアント証明書と秘密鍵の作成
./easyrsa build-client-full user1
Generating a 2048 bit RSA private key
.................+++
............................+++
writing new private key to '/usr/share/easy-rsa/3/pki/private/user1.key.y5xGTr558R'
Enter PEM pass phrase:
Verifying - Enter PEM pass phrase:
-----
Using configuration from ./openssl-1.0.cnf
Enter pass phrase for /usr/share/easy-rsa/3/pki/private/ca.key:
Check that the request matches the signature
Signature ok
The Subject's Distinguished Name is as follows
commonName :ASN.1 12:'user1'
Certificate is to be certified until Mar 30 05:26:53 2028 GMT (3650 days)

Write out database with 1 new entries
Data Base Updated
わたしは、OpenVPNのWindowsクライアント用にvpnux、Mac用にTunnelbrickを使っています。
※vpnuxは1.4.6.2以上を利用してください。古いvpnuxでは接続できますが通信に失敗します。
両方のクライアントともパスワードが保存できるので、だれでもセットアップしてつなげられないようにパスワードを設定しています。
最初のパスフレーズが、クライアント証明書のパスワード、後のパスフレーズが認証局作成時のパスワードですを入力します。
作成されたファイルは、pkiディレクトリ内の各サブディレクトリに保管されています。
private:秘密鍵
reqs:証明書要求
issued:証明書
OpenVPN設定
OpenVPN設定ファイル作成
/etc/openvpn/server.conf
port 1194
proto udp
dev tun
ca /usr/share/easy-rsa/3/pki/ca.crt
cert /usr/share/easy-rsa/3/pki/issued/server1.crt
key /usr/share/easy-rsa/3/pki/private/server1.key
dh /usr/share/easy-rsa/3/pki/dh.pem
server 10.200.0.0 255.255.255.0
ifconfig-pool-persist ipp.txt
push "route 10.0.5.0 255.255.255.0"
push "route 10.0.11.0 255.255.255.0"
keepalive 10 120
cipher AES-256-CBC
comp-lzo
persist-key
persist-tun
status openvpn-status.log
verb 3
explicit-exit-notify 1
push “route”のところはVPNのサブネットのIPアドレスになります。
IPアドレスにあわせて変更してください。
OpenVPNの起動
/etc/init.d/openvpn start
OpenVPN自動起動設定
chkconfig openvpn on
IP Forwarding設定
/etc/sysctl.conf
net.ipv4.ip_forward = 0の行があるので1に変更してください。
net.ipv4.ip_forward = 1
sysctl -p
Tunnelbrick設定ファイル
接続テストはMacを利用して行いました。
Tunnelbrickはこちらからダウンロードできます。
client
dev tun
proto udp
remote OpenVPNサーバIPアドレス 1194
resolv-retry infinite
nobind
persist-key
persist-tun
ca ca.crt
cert user1.crt
key user1.key
cipher AES-256-CBC
keepalive 10 60
verb 3
mssfix 1280
AWS設定
- OpenVPNをインストールしたサーバにEIPを設定
- OpenVPNをインストールしたサーバにセキュリティグループを追加し設定
- OpenVPN経由でアクセスさせたいPrivateネットワークのサーバに対して、セキュリティグループからのアクセスを許可
- Privateネットワークのルートテーブルに、VPNクライアント側のセグメントから、OpenVPNをインストールしたサーバへのルーティングを設定
- OpenVPNをインストールしたサーバで送信元/送信先の変更チェックを無効に設定
AWSに慣れている方ならここまでで設定が一気に終わると思います。
ここからはAWS設定について詳細に解説します。
OpenVPNをインストールしたサーバにEIPを設定
この作業でグローバルIPアドレスを取得します。
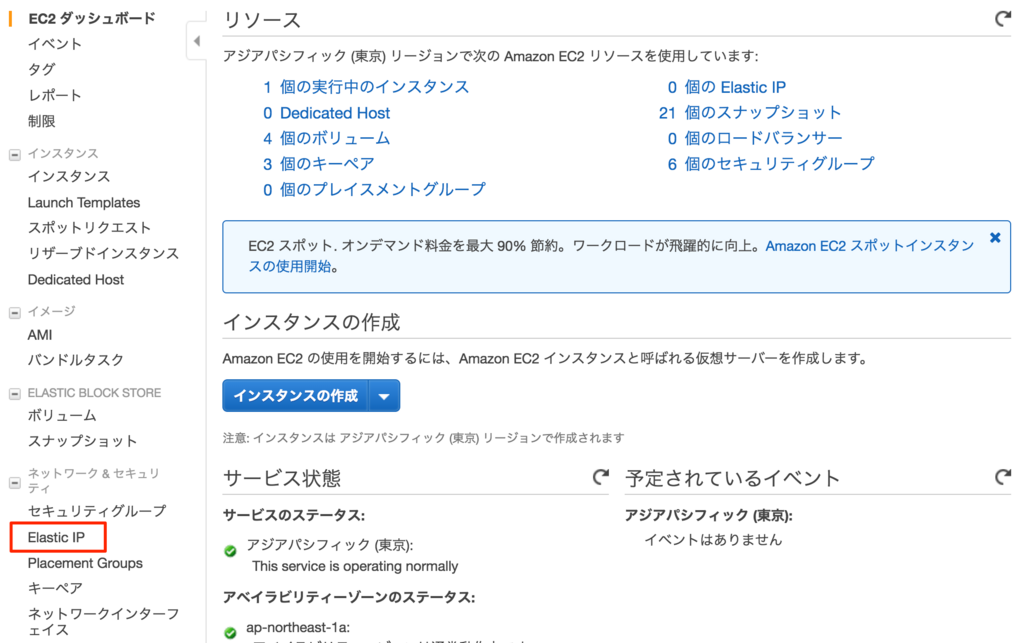
EC2 ダッシュボードを表示し、「Elastic IP」をクリックします。

「新しいアドレスの割り当て」をクリックします。

「割り当て」をクリックします。

Elastic IPが割り当てられました。
「閉じる」をクリックします。
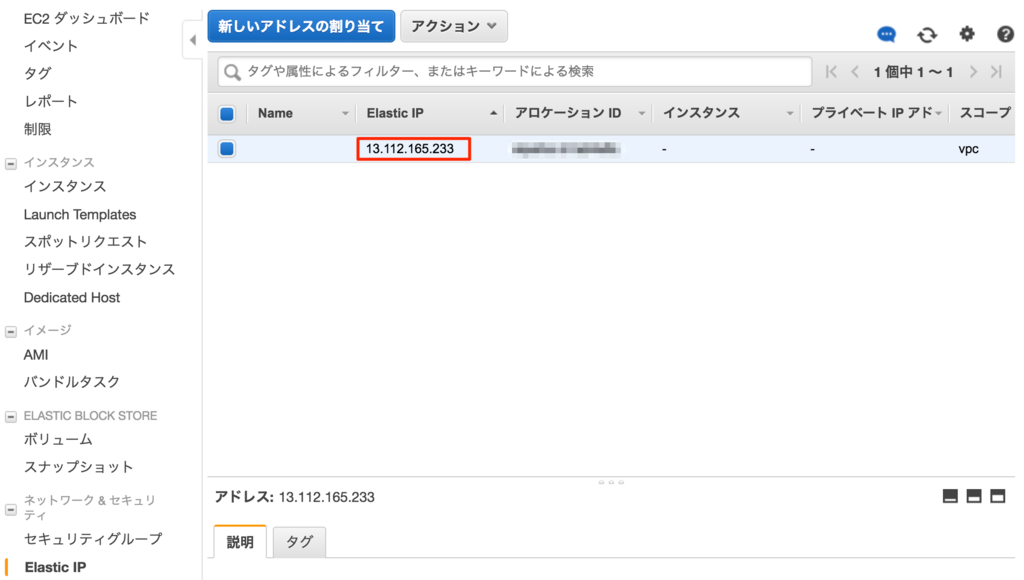
Elastic IPの一覧にも表示されました。
Elastic IPをOpenVPNサーバにアタッチします。

Elastic IPを選択し、「アクション」-「アドレスの関連付け」をクリックします。
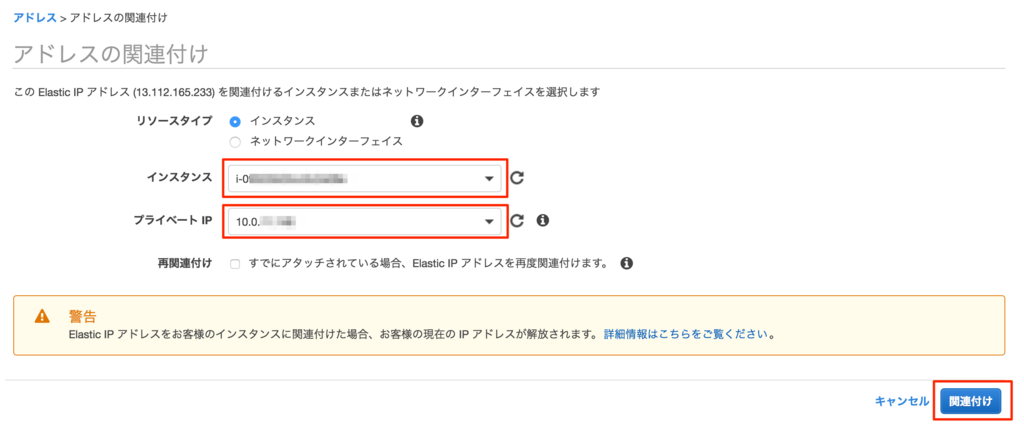
OpenVPNの「インスタンス」「プライベートIP」を選択し、「関連付け」をクリックします。
OpenVPNをインストールしたサーバにセキュリティグループを追加し設定
server1というセキュリティグループを作成します。
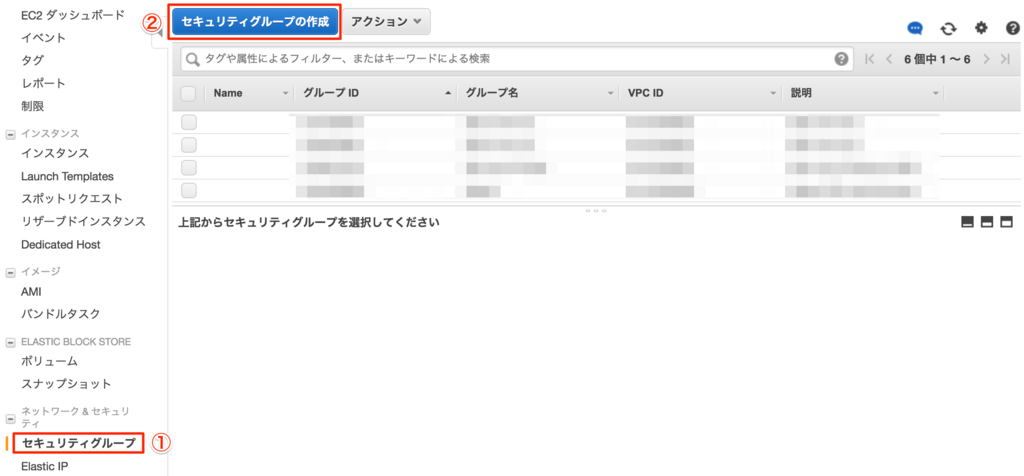
EC2 ダッシュボードを表示し、「セキュリティグループ」をクリックします。
「セキュリティグループの作成」をクリックします。
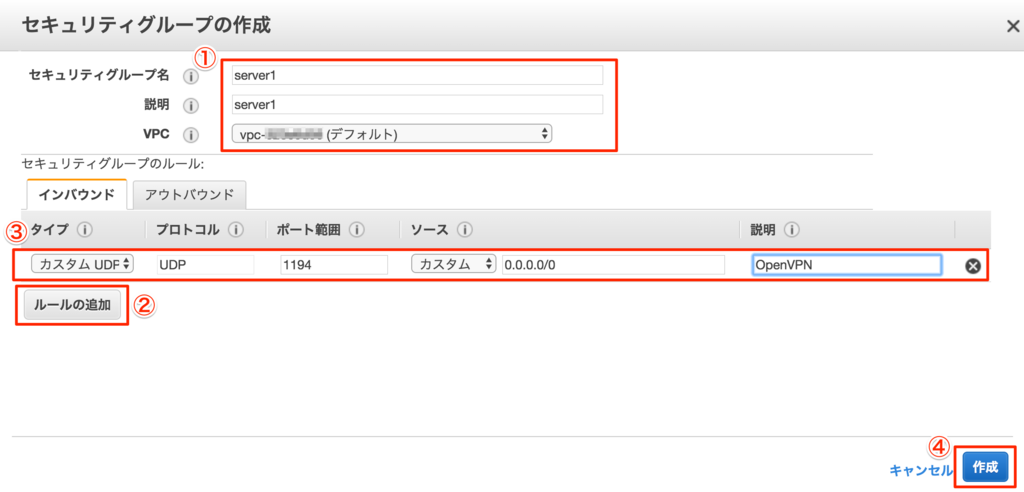
「セキュリティグループ名」「説明」を入力し、「VPC」を選択します。
「ルールの追加」をクリックします。
カスタムUDPを選択、ポートは1194を入力、ソースは0.0.0.0/0を入力します。
「作成」をクリックします。
OpenVPN経由でアクセスさせたいPrivateネットワークのサーバに対して、セキュリティグループからのアクセスを許可
Privateネットワークのサーバに設定されているセキュリティグループに追加します。
引き続きセキュリティグループで作業します。
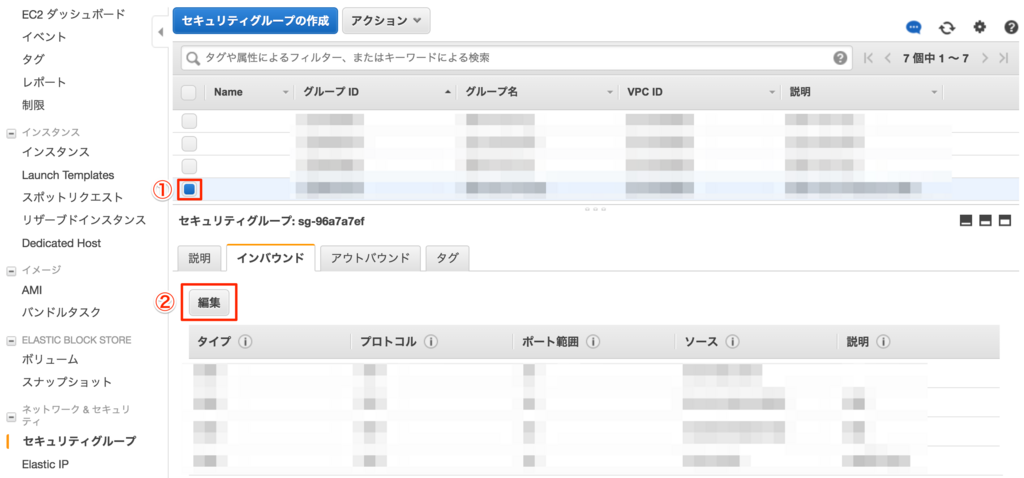
OpenVPN経由でアクセスさせたいサーバに設定されているセキュリティグループを選択します。
インバウンドタブで「編集」をクリックします。
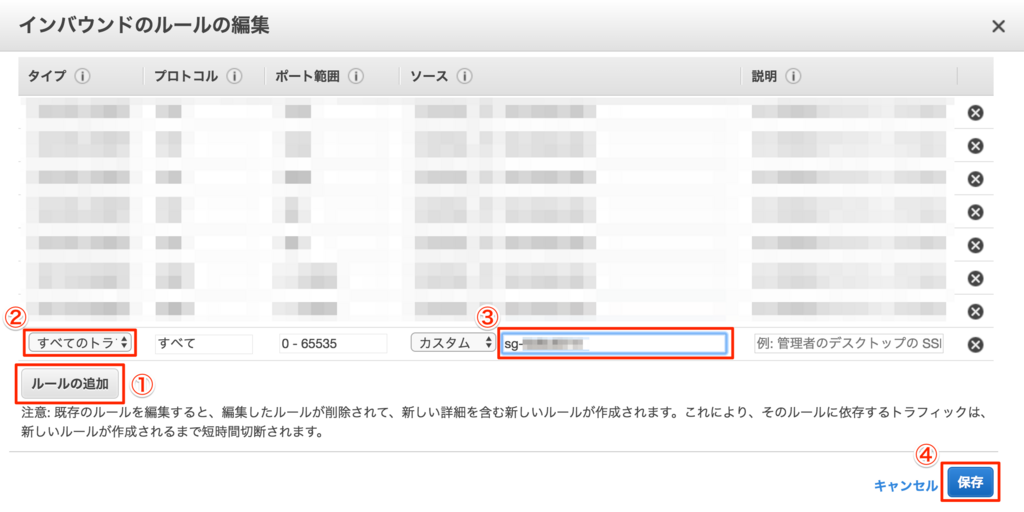
「ルールの追加」をクリックします。
「すべてのトラフィック」をクリックします。「ソースでセキュリティグループ」を選択します。セキュリティグループを選択にするには「sg」と入力することにより一覧が表示されます。セキュリティグループがたくさん存在する場合は、セキュリティグループからコピーしてきましょう。
すべてのトラフィックではなくもっとポートを絞ることも可能です。
「保存」をクリックします。
Privateネットワークのルートテーブルに、VPNクライアント側のセグメントから、OpenVPNをインストールしたサーバへのルーティングを設定
「VPC」-「ルートテーブル」をクリックします。
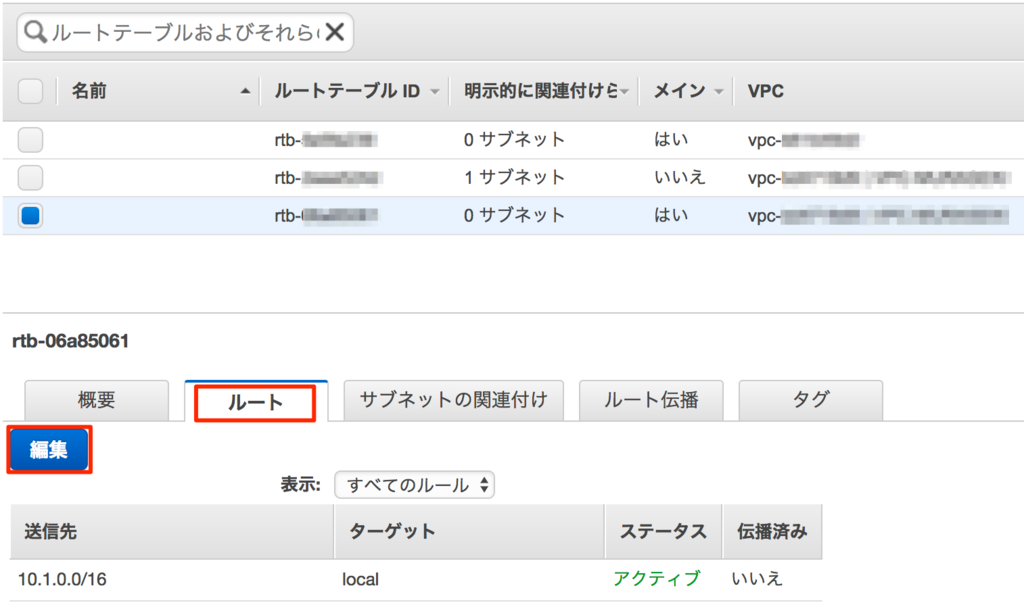
プライベートネットワークのルートテーブルを選択し、「ルート」タブをクリックし、「編集」をクリックします。

「別のルートを追加」をクリックします。
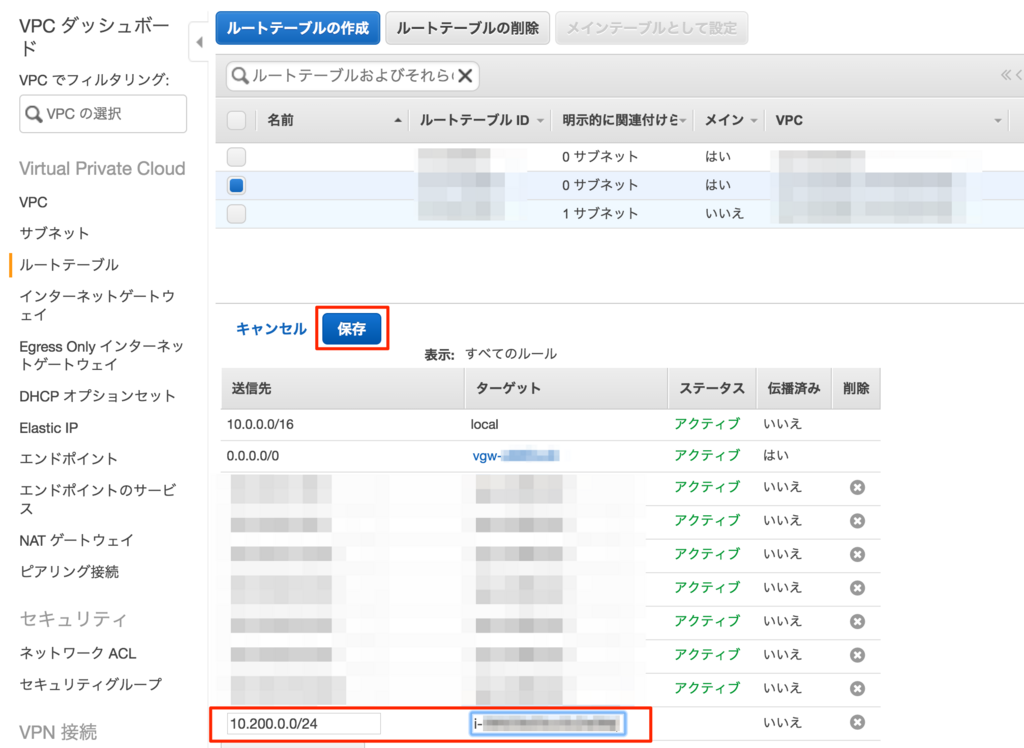
送信先に今回OpenVPNの設定でクライアントへのIPアドレス付与した「10.200.0.0/24」を入力し、ターゲットにOpenVPNがインストールされたインスタンスを選択し、「保存」をクリックします。
ターゲット入力時に「i」を入力するとインスタンスの一覧が表示されます。
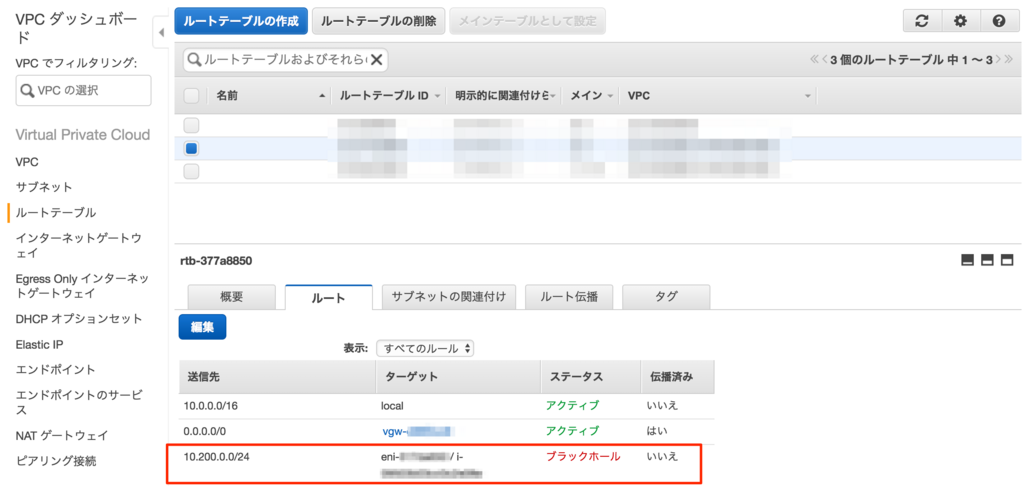
この状態になれば設定完了です。
プライベートサブネットへのアクセスは、10.200.0.0/24からになりますので、あわせてセキュリティグループの設定が必要です。
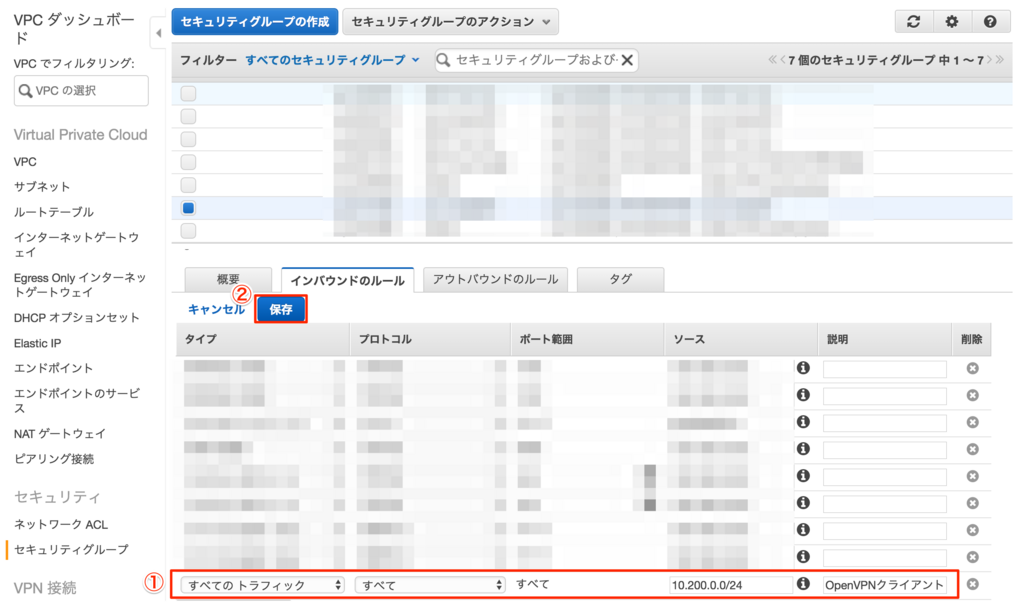
このルールを追加し、「保存」をクリックします。
OpenVPNをインストールしたサーバで送信元/送信先の変更チェックを無効に設定
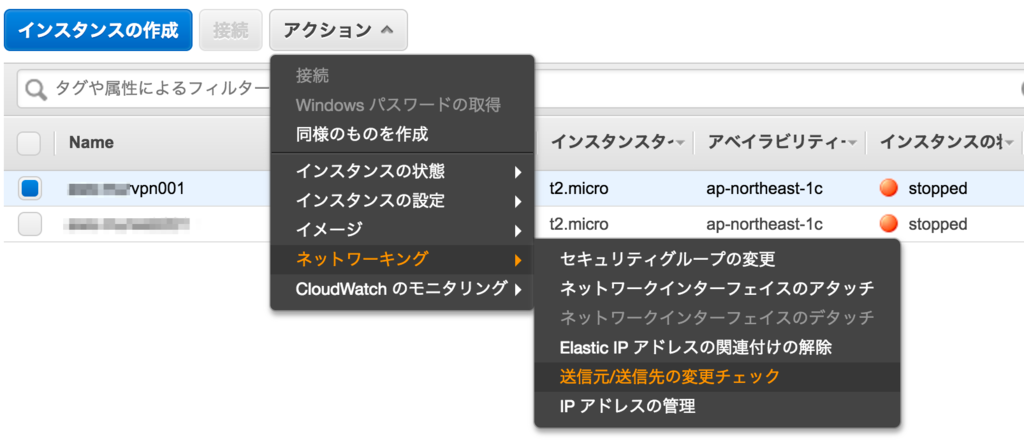
OpenVPNをインストールしたサーバを選択し、「アクション」-「ネットワーキング」-「送信元/送信先の変更チェック」をクリックします。
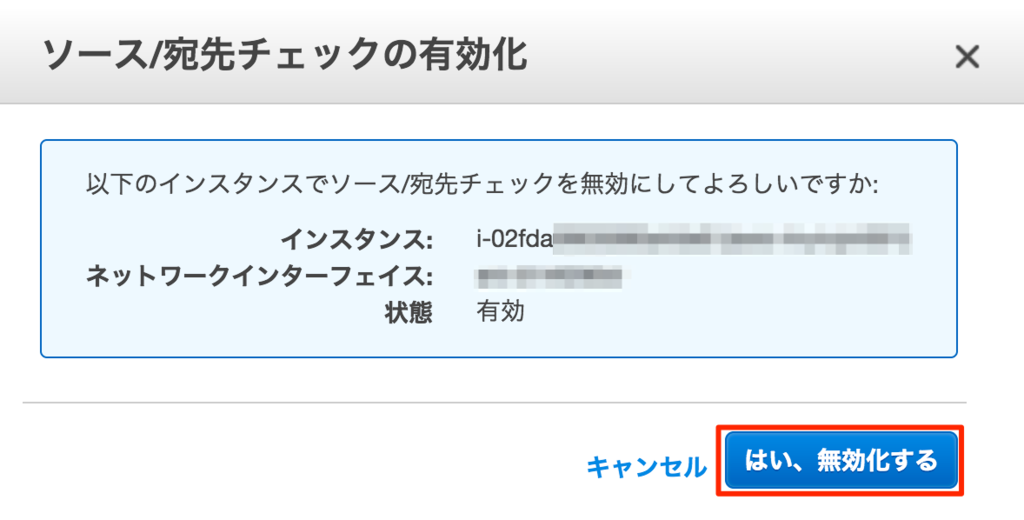
「はい、無効化する」をクリックします。
同じオペレーションで、すぐに有効化することもできます。
